What would you do if your boss asks you to add watermark to a hundred PDFs and send these watermarked PDFs to him within an hour? Yes, this can be a similar scenario faced by many office workers. Any novice person would go one by one on these 100s PDFs to add watermark. But it will be a tedious and a time-consuming job. For performing batch process on pdfs, please read on.
In Adobe Acrobat you can automate this process of adding watermark on multiple PDFs. Alike VBA in Microsoft Office, Adobe Acrobat has an “Action Wizard“. As the name suggests, Action Wizard simply automate PDF jobs with predefined actions or we can perform batch process on pdfs through it.
Watch the short video below for the better understanding of batch processing in Acrobat.
Make a backup first
Before going further, please make a backup of your files as it is a good practice and you will also be on your safe side.
Action Wizard in Adobe Acrobat
This is a great feature in Acrobat, especially when you need to work on multiple PDFs. You can automate many tasks through this “Action Wizard“, such as deleting specific pages from 1000s PDFs, adding background to them or inserting page numbers, etc. For the sake of simplicity, we will take a look at adding watermarks on multiple PDFs with Action Wizard.
Adding watermark on multiple PDFs
Before starting, place all your PDFs in a single directory, wherever you find suitable. In my case, I have created a directory named “PDFs Batch Process” on my “Desktop” and placed five PDFs there having multiple pages each.
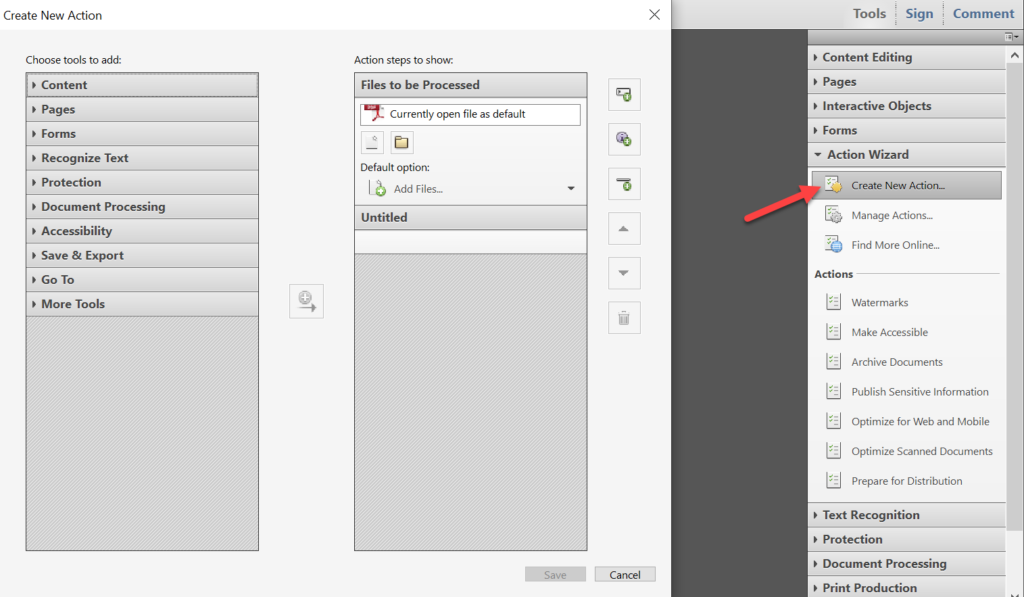
Open Adobe Acrobat now. Then go to the “Tools” menu at the right side. Now click on the “Action Wizard” from the Tools menu, to expand it. Also make sure you have Action Wizard selected from the tiny context icon at the top right of the Tools menu.

Now at Action Wizard, click on “Create New Action…“. You will see a “Create New Action” dialog box then.

From the new dialog box, first add your folder where you already have placed your PDFs. Simply click on the “folder” icon from the right hand pane of “Action steps to show” and add your folder by browsing.
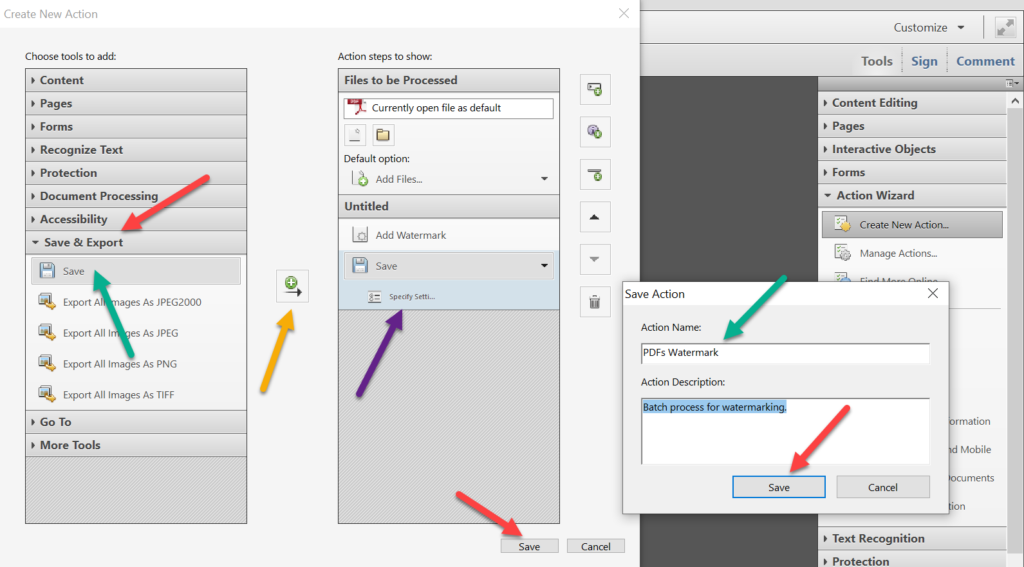
After adding folder, expand the “Pages” menu from the left hand pane of “Choose tools to add“. Then select the action “Add Watermark” and click on the center icon with an arrow to add the action to the right hand pane. From the right hand pane, uncheck the mark from “Prompt User” as we don’t want user interactions during the process.

Set the watermark you need
From the same right hand pane, now click on the button “Specify Settings” to open a watermark dialog box. Set your desired watermark here. In the text field, simply write “Confidential“. Make opacity to 20% and select 45 degree angle and select the option “appear behind page“. On the same dialog, you can set your page-range and appearance options as required.

After setting your watermark, click on the “OK” button to close the dialog box. You have set your watermark. To make this process fully automated, we will have to add one more action, i.e. save the files without user interaction.
To add the “Save” action, expand the “Save & Export” menu from the same dialog. Then select the action “Save” and click on the center icon with an arrow to add the action to the right hand pane. You don’t need to specify settings for this “Save” action as defaults are okay for thing we are doing. If you want to review the settings for this “Save” action, simply click on “Specify Settings” to see them.

We are almost done now. Click on the Save button, give your action a name and then click on the “Save” button again to exit from the dialog. Your new Action for adding watermark on multiple PDFs has been created. You will find this newly created action in the Action Wizard group on the Tools menu.

To run this action, simply click on it and then click on the “Start” button. After pressing the start button, Acrobat will add the watermark on all the PDFs in your specified directory and save the changes in the same PDFs.

Summary about batch process on pdfs
We have added two actions through Action Wizard in Acrobat – one is the “Add Watermark” for adding watermark and the other is the “Save” for saving the changes without user interaction.
This is just an example of processing multiple PDFs, you can also find many other actions to automate through the same Action Wizard. Hope it helps!
Want to repeat text automatically in Ms Word, read the post here:
How to auto populate certain text in Ms Word 2019
