
After successfully running a website, almost every blogger or a webmaster ultimately looks for some methods to earn online whether through displaying ads on their websites or by means of some affiliate marketing. The final goal is to earn money through websites. Here, we will talk about how to add Media.net in WordPress site.
Before going into further details, let us first clear that we’re NOT writing any details here about earning money online but we’re only talking about placing Media.net ads on a WordPress website in a complete & straightforward manner. However, you can find a lot of articles even more than this to learn about making money online. And our purpose here is to guide beginners about adding Media.net ads in their WordPress properly.
What is Media.net company?
In its simplest form: Media.net is a leading global advertising company with one of the most comprehensive portfolios of advertising technology in the industry across search, native, display, mobile, local, products and video.
By market cap, Media.net is one of the Top 5 largest ad tech companies worldwide. By revenue, Media.net is the second largest contextual advertising business worldwide.
Source: https://www.media.net/aboutus
You can find more information about Media.net, simply Google it. We’re not going into the details, keeping our post simple and straightforward.
Is Media.net really pay?
Yes, it is definitely! You may have read some myths about Media.net or whether is it a legit company and so on… The truth is that Media.net is definitely a legit company and second largest Contextual Ad Network, of course after Google’s Adsense.
What is more interesting here is that some big even bigger websites use Media.net like WebMD because of its high paying potential.

As seen in the above picture from WebMD, there remains no doubt that Media.net is a BIG and trustworthy earning platform.
How to create a Media.net account?
If you think your website fulfills all the requirements of Meda.net then you should definitely join Media.net to start or even increase your revenue. Its free to join Media.net. You can simply click on the following link to sign-up for Media.net.
Please note that the below link is a “referral link” and upon your successful creation of the working account through this link, we’ll get a referral commission and you’ll also be rewarded with a bonus earning of 10%. Simply follow this link to get started: http://bit.ly/2QNC4k2
Approved on Media.net? What’s next
So you have just approved on Media.net, now what’s next? First of all, congratulations and keep up the great work! You would have received an email about your approval on their platform. Along with the same email, three default ad units, called starter pack, would also be there in a plain text format. Skip them at the moment and come to the Media.net dashboard by logging in.
Media.net Publisher Console (beta)
After logging in, you will land on a beta version of Media.net dashboard. It looks good with flat interface. Check it a bit to make yourself familiar with this dashboard. It will be something like the below image.

Add Media.net ads with Ad Inserter plugin
We’re now here at the right part. We will use the Ad Inserter plugin for adding Media.net ads in WordPress. Ad Inserter is really a useful & free plugin with many options and controls for customized ad placements. If you don’t already have Ad Inserter plugin installed then please first install it from the step-1 below, otherwise, go to the step-2.
Step-1: How to properly install Ad Inserter plugin in WordPress
Click on the Plugins button on the left of the WordPress dashboard to open the plugins page. Click on the Add New button on the same page.

Write Ad Inserter in the search box at the top right and click on the Install button on the first appeared result.
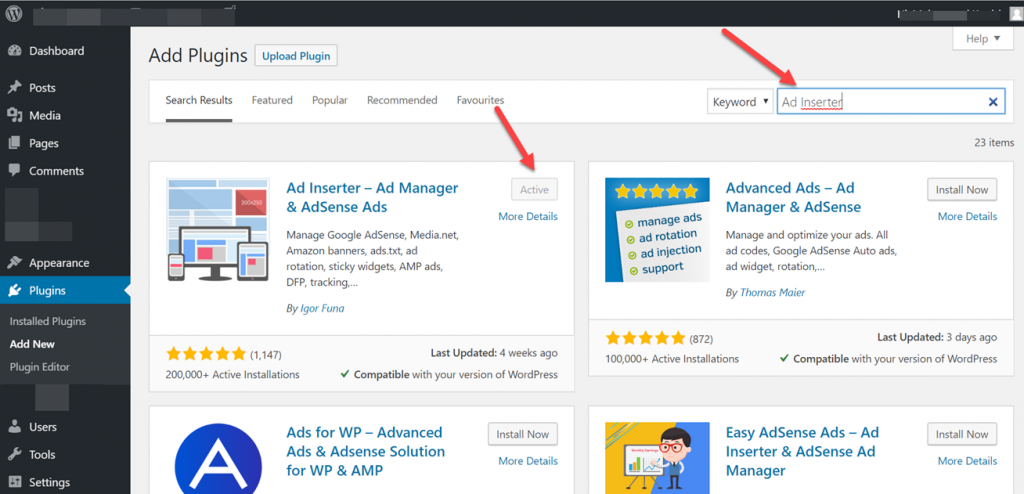
It shows Active above because we have this plugin installed already.
After installing the Ad Inserter plugin, go to the Plugins page. Now click on the Activate button to activate this plugin.

Step-2: Adding code for Media.net ads in Ad Inserter
We will use Asynchronous code for adding our ads. To know the difference between Asynchronous and Synchronous, Google it. If loading a web page faster is on your priority then using Asynchronous code is best here.
Adding header code for Asynchronous ads
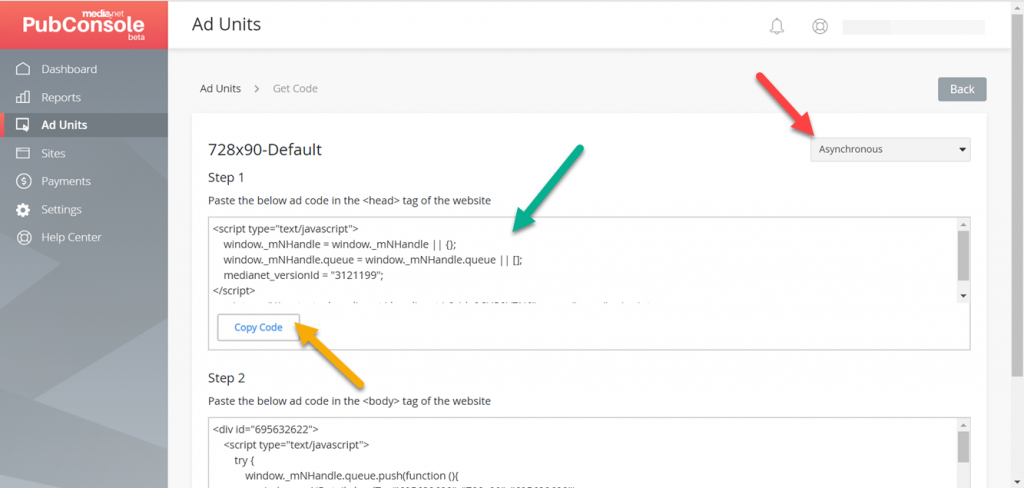
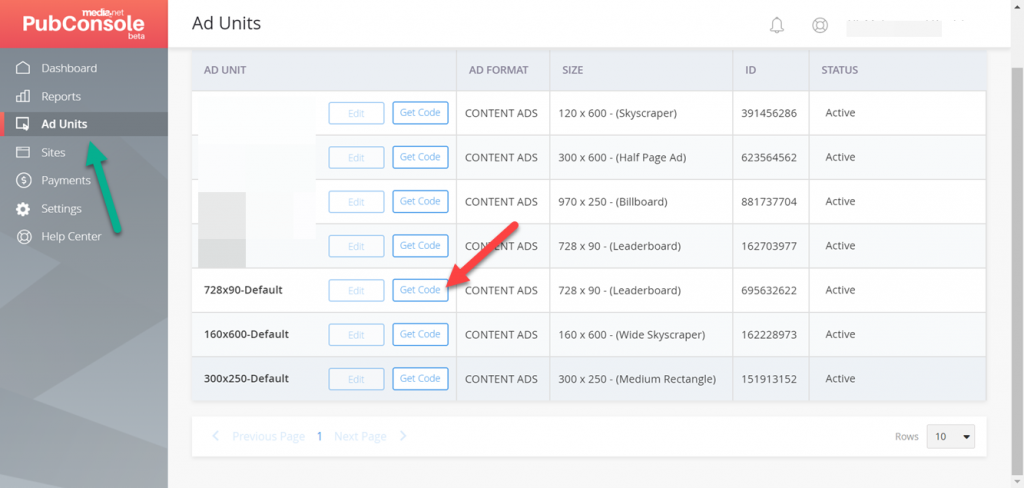
To copy ad codes, first go to your Media.net dashboard. Click on Ad Units. From the first default ad unit click on the Get Code button.

Then click on Copy Code from the first window. This will be a code for header, it needs to be added only once.
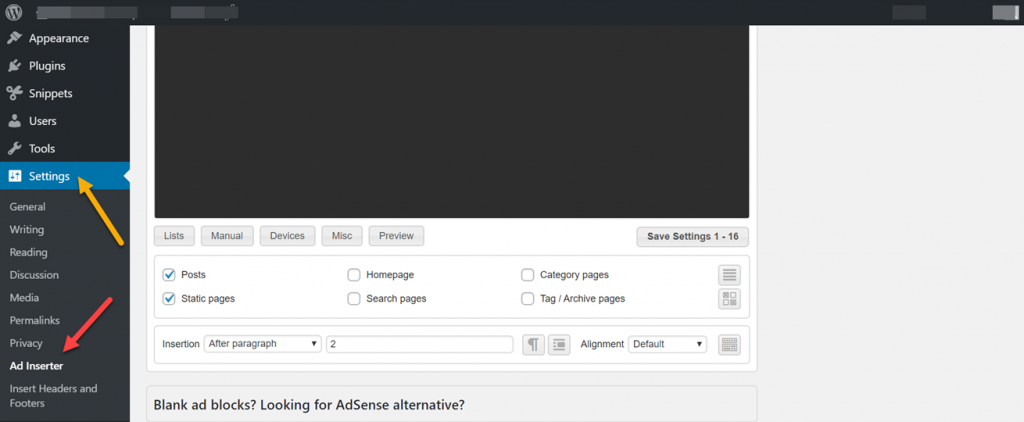
Now, in your WordPress dashboard, go to Settings > Ad Inserter to open Ad Inserter settings.
On the Ad Inserter page, click on the Gear icon, then click on the Header button there and paste the code which we just copied above into the black window. Click on the little circled button as well to activate this code. Finally click on the Save Settings button to save all your changes.
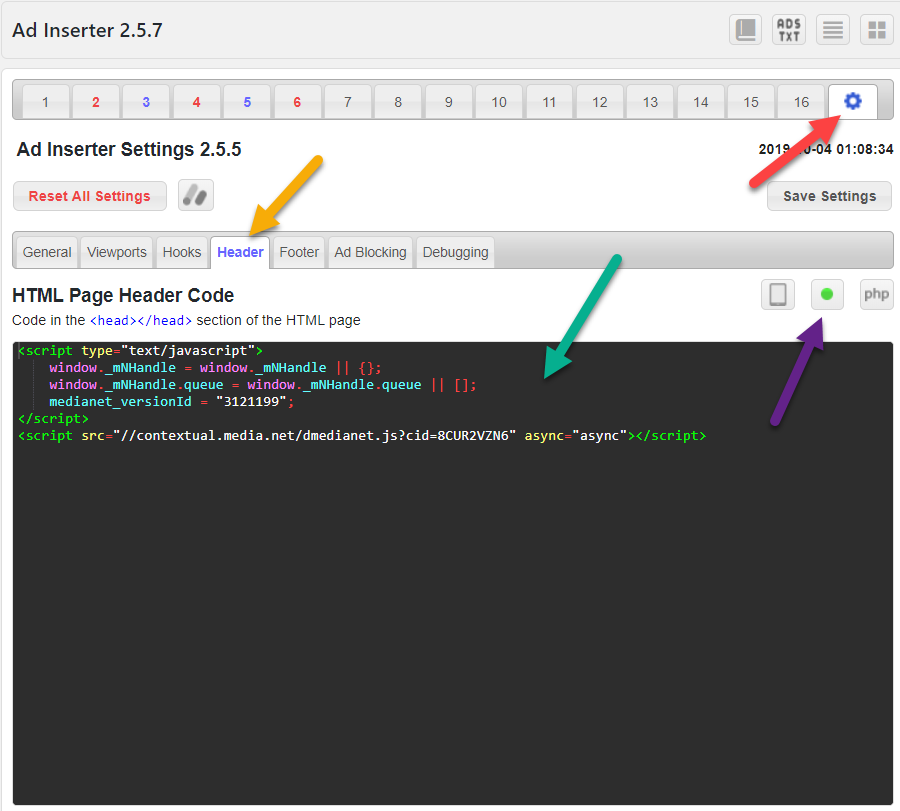
Make sure you use your own code. Must not try to use the above code.
Alright, so we have now finished our first part. We have added the header code through the Ad Inserter plugin.
Creating ad units in Ad Inserter plugin
We will add the default ad unit – 728 x 90. For adding this 728 x 90 ad unit, go to your Media.net dashboard again. Click on Ad Units and from 728×90-Default row click on Get Code.
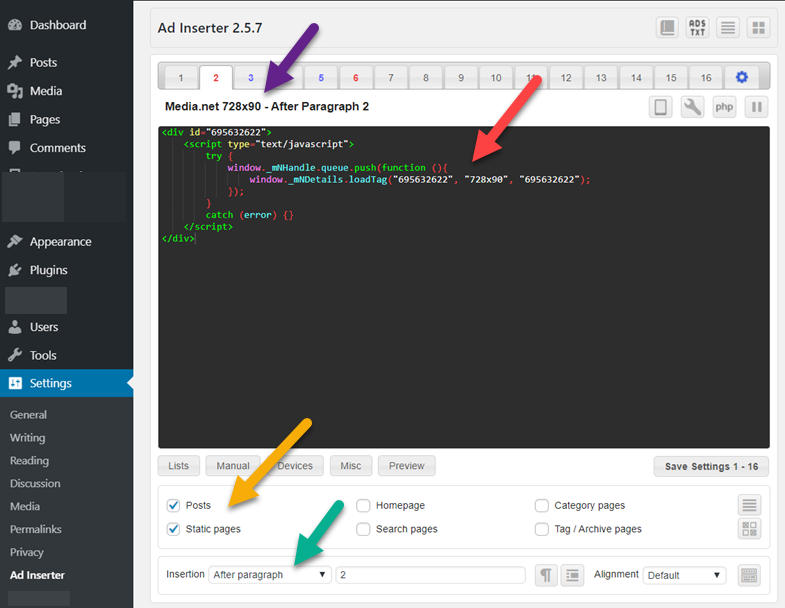
Now, from the second window, click on the Copy Code button to copy the code for this ad unit.

After copying the code above, go to the Ad Inserter page again. Paste this code into any of the blocks on Ad Inserter. Give this block some meaningful name. Check boxes for Posts and Static pages. From the Insertion menu, select After Paragraph and enter the numeric value 2 in the text box. After making these changes, must click on Save Settings at the bottom to save all your changes.
That is, we have done it! We have successfully added a 728 x 90 ad unit in our website.
This is not mandatory in any way to use the above settings only, you can make whatever change you like and put your ad wherever you find it best. Our above code & settings will simply place a 728 x 90 ad unit after paragraph 2 on every post and on every static page.
If you are new to Ad Inserter or placing ads on website then you should try different combinations with patience & practice.
Final thoughts on how to add Media.net ads in WordPress
Media.net is a legit company. For adding Media.net ads, we can use Ad Inserter plugin. For asynchronous ads, we will have to put the header code as well. You can’t add more than 3 Media.net ads on a single page or post, so also take care of it.
Keeping the above settings in mind, you can add as many ads as allowed in your website with many different positions and combinations.
Hope you find this post helpful! Share your thoughts in the comments box below.
Thank you for your guidance, recently my blog approved with media net but I can’t find any information about this, so thanks for sharing such valuable information.
Thank You. It helped me a lot. I was facing issues with my website as my media.net ads which i have inserted manually into the article were stopped displaying. This helped in solving the issue. Grateful to you in every sense.
Thank you! I went through 5 non helpful blogs about this topic before finding yours! Quick and to the point, thanks again!
Thanks for your nice words. Glad it helped you 🙂
I already have an approval of media.net. now how to add another website for approval? where will I get the code for my 2nd website?
At the left panel of your PubConsole, you will find a menu named “Sites”. Going to the “Sites” option, you can add more websites by using the option “Add New”. Thank you.
Thanks, buddy. This post really really helped me to deploy ads. Quick and easy. Before this post, I was struggling a lot. Thanks once again buddy
thanks i recently approved my site on media.net.
Thanks for your article very helpful for me to place my ads.
Fantastic man! Helped me a lot! Question: I have adsense on my site also. Instead of pasting those codes in the actual header, can I paste it underneath the media.net code in the same place?
Thank you 🙂 Yes, you can definitely put multiple site-wide header codes through Ad Inserter plugin.
Thank you SO much for this! I’ve been reading every blog post/watching every video I could find and this is the first one to lay it out clearly and easily. Thank you!!
Thank you, Krista! Glad it was helpful for you.
Hey, thank you for this helpful post!
I followed all the steps on my WordPress website but the ads are not visible? What could be the problem? I would really appreciate any help!
Hi Niki, thanks for taking time for going through the article! Please make sure you have included the header code correctly. Also, after inserting the ads code, please give it some time for displaying ads (though ads should appear immediately). Also ensure you don’t using any ad-blocker on your browser. Moreover, try opening your website on more than one browser, hope your ads will display soon. Let me know if you need more help, thank you.
This post helped me so much! There are other blogs out there that tried to explain this process but none that did it this well. This was so simple to follow and saved me so much time. Thank you!
Your post is really helpful, thank you so much!
I just had a doubt. You mentioned that we can have only 3 ads per post but then mentioned we can ‘add as many ads as allowed in your website’.
Can you please explain this how we can add more than 3 ads?
Glad it was helpful for you! Yes, you can add ONLY 3 ads on any page/post. This is a policy of Media.net, they do not allow adding more than 3 ads on a single page. As for “adding as many ads…” you can however use Google Adsense along with Media.net to put more than 3 ads on any single page or post.
Long story short, 3 ads as per Media.net policy are allowed and if you have Google Adsense available too then you can place the Adsence ads as well. Even if you have any other advertising account approved then you can add their ads too. This way, you can add as many ads as you want (simply by using the Ad Inserter plugin)! However, adding too many ads (on a single page) is not a good idea though. Thank you.